Grade Book Help
Manhattan's Grade Book is designed as a simple web-based system for
recording student grades within a Manhattan classroom.
The basic steps are:
- Click on the Final
Grades tab to decide how, or if, you want to calculate a
final grade.
- Click on the Categories
tab to set up Categories to hold your gradable items.
- Click on the Items
tab to create one or more gradable items for your course.
- Click on the Grade Book
tab to enter grades for your students.
- Click on the Release
tab to make a 'snapshot' of your grade book available to your students.
This help document describes each of these areas in more detail.
While working with the Grade Book, you can click on the help
icons  to jump to a section of this file that
describes that particular feature.
to jump to a section of this file that
describes that particular feature.
(Jump to top)
Grade Book

The Grade Book tab is where you actually enter your grades.
Before you can start, you need to:
- Click on the Final Grades tab and choose a method for
calculating students' final grades.
- Click on the Categories tab and set up categories for your
gradable items.
- Click on the Items tab and create one or more gradable
items.
Once you've set up your Categories and have used the Items tab to
create one or more gradable items, you'll see your grade book appear as
a table.
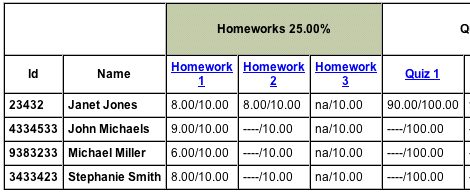
As shown in the section of a sample grade book above, the columns of
the table
represent gradable items and the rows
represent students. To enter grades for an item, click on the
name of the item in the heading of the table. For
example,
if you wanted to enter or change the grades for Homework 3 in the above
example, you would click on the "Homework 3" link.
Gradable items are grouped by categories. Within each
category,
the date field of an item controls which item appears first.
Within the table the letters 'na' stand for 'not available', and are
used to mark grades that haven't been entered yet. Similarly
the
'----', symbols indicate grades you have marked as 'pending'
(see
below).
When you click on an item to enter grades, you'll get a form that looks
like like the image below.
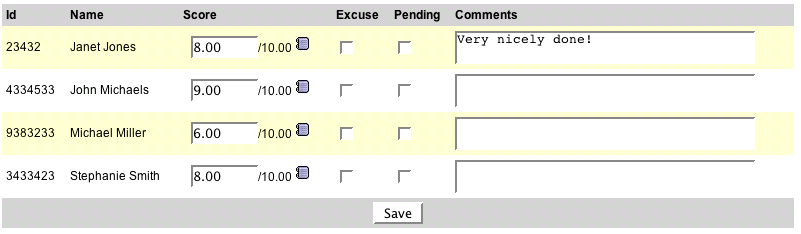
Score
Enter the score achieved by each student for this item. If
the
'letter grades' option was selected when this item was created, a
drop-down list of letter grades will appear.
Otherwise, you'll need to type in a number for each student's
grades.
Excuse
Check the 'Excuse' box to excuse a student from completing an item.
An excused item is treated as if the item was never assigned
for
that student. Internally, it behaves exactly the same as the 'Pending'
setting (see next). The difference is that a red asterisk * will appear next to excused
grades in your grade book.
Pending
A 'Pending' item is one that has not yet been graded. When
you first begin to enter grades for an item, all students' grades for that item are marked Pending.
When you enter a grade (score) for a student, you'll find
that the Pending box is automatically unchecked. Internally
the program treats a Pending item as if it has never been assigned to
that student. That is, a Pending item is not used in the
calculation of a final grade for that student.
When it becomes clear that a student will not be submitting work for
you to grade, you should can either deliberately Excuse the student
from the assignment (see above), or assign a '0' score to that student
for that item. If you simply leave uncompleted work marked
Pending, there is no negative effect on the student's final grade.
Comments
Optionally, you can enter a comment for each student's grade you enter.
The student can read any comments you enter when grades are
Released to them.
(Jump to top)
Items

An "Item" is a gradable item, such as a particular homework assignment,
quiz or exam. The tools under the Items tab are used to
create,
modify and delete these gradable Items from your grade book.
Since each item must be assigned to a "Category", you might want to use
the Category tools to create your categories before you start adding
Items to your Gradebook.
Item name
This is the name of the item. You'll find that
certain
punctuation
marks are not allowed within an Item name. Examples of Item
names are "Homework 1", "Einstein Project", and "First book report"
Category
Each gradable item must be assigned to a Category, which is created
using the tools under the Categories tab. It's a good idea to
create your categories before you start adding Items to your gradebook.
Extra
Credit Item?
You have the option of marking an Item as "Extra Credit".
When
calculating a final grade, points scored on extra credit items are
simply added to the overall point total for that category.
Since
the total points possible for an extra credit item are not considered,
there is no penalty
for poor performance on an extra credit item.
If you select "ALL", then all students will see a
column for this item in their view of the gradebook when grades are
released. If you select "Partial", the item will appear in a student's
view of the gradebook only when you give that student a
grade for the item. The difference is subtle - the "Partial" option allows you to offer extra credit assignments to
select
students without advertising that fact to the entire class.
Scoring Example. Suppose you are using the 'Category weight system' to
calculate the final grade. You have a category named
"Quizzes" to
which you have assigned a weight of 25%. A student gets the
following scores:
| Item Name |
Student
Score |
Total
Possible Points |
| Quiz 1 |
8 |
10 |
| Quiz 2 |
6 |
10 |
| Quiz 3 |
4 |
10 |
When calculating the final grade the contribution towards a 100%
perfect score from the Quizzes category is:
((8+6+4)
/ (10+10+10)) X 25% = 15% out of a possible 25%
Now suppose the student takes another Quiz marked as an "Extra Credit".
The student scores 2 points out of a possible 10 points for
the
quiz. These two points are simply added to the "Student
Score"
column in the above table. (The fact that the extra credit
quiz
was worth 10 points, and that the student seems to have failed this
extra credit quiz
with a poor 2/10 or 20% score is not considered.) The
contribution of the Quizzes category for this student's final grade is
now:
((8+6+4+2) / (10+10+10)) X
25% = 16.67% out of a possible 25%
Again, for an extra credit item the student's raw score is simply added
to the total points scored for that category and the "total possible
points" for an extra credit item does not come into play. A
consequence of this is that offering an extra credit item often makes
sense only when the "total possible" points for each item in that
category are the same for each item. (E.g. in our above
example
each quiz was worth ten points). Suppose the extra credit
quiz in
the above example was worth 100 points instead of 10, and the student
again scored a poor 20/100 correct. Since the student scored
20
points, after applying the extra credit, the contribution of the
Quizzes category for this student's final grade would be:
((8+6+4+20) / (10+10+10)) X
25% = 31.67%
The student scores a whopping 31.67% out of 25% for Quizzes as a result
of failing an extra credit quiz with a 20% score. This is probably not
what you intended!
Grading
method
When you assign a grade to a student for a particular item, you can
choose to give a letter grade, such as "A" or "B+", or to give points
such as "97" or "88".
If you select "Points", a Maximum Points text box becomes available.
This form element is used to specify the maximum
number of
points that can be earned for that item. For example, you may
decide that a particular Quiz is worth 10 points.
If you select "Letter Grade", you must also specify the "letters" which
can be assigned, as well as a numeric value associated with each
letter. This is done using the following form:

You are free to modify the grading scale to meet your needs.
Using the above table, assigning a grade of C to a paper is
the
same as giving the paper a score of 75 using the Points scoring method.
Date
The Date and time fields are required, but they have no particular meaning. However, note the Date and
Time
fields are used to sort items within a category whenever they are
listed.) You can use it to specify the due date for an assignment, or
the date an exam was given. Only you, as the
teacher, will
ever see this date.
Hide
You can use this control to hide an item from students when grades are
released. This
is
especially useful if you want to create all of your gradable items at
the start of the course and don't want to clutter up the student view
of the gradebook with items that have not yet been graded. Hidden
items are not used in the calculation of a final grade. A hidden item
is treated as if it were never assigned to the class.
Graded
The Graded column indicates whether or any grades have been issued to
students for this item. A check mark  means that you have assigned
a
grade for this item to one or more students.
means that you have assigned
a
grade for this item to one or more students.
Delete
Deleting an item PERMANENTLY deletes all scores associated with that
item. Use the Delete option with care!
(Jump to top)
Categories

Each gradable Item must be assigned to a category.
The Categories tools are used to create and edit categories.
Examples of categories you might create include
"Quizzes",
"Homework", "Papers", "Exams", "Midterm Exam", "Final Exam", and so on.
A new grade book has a single category named "General",
which you probably will want to rename.
The importance of Categories depends on the method you select for
calculating a final grade using the options under the Final Grades tab.
If you select "Do not
calculate a
final grade" or the "Point-based system" under the Final
Grades tab,
then how you organize gradable Items under categories is less
important. You
can leave the categories as you found them, with one category
named "General". As you add gradable Items (using the tools
under
the Items tab) you can assign all Items to the "General" category.
However, for the sake of organization, you may still want to create
categories for Homework, Quizzes, Papers, and so on.
Since you are not calculating a final grade or are using a
point-based system, the Weight you assign to each category (described
below) is not
important.
The categories are most important when you select the "Category weight
system" as the Final Grades scoring method. In that case the
Weight assigned to each category comes into play. For
example,
the
categories and their weights might be:
Homework
20%
Quizzes
15%
Midtern Exam 25%
Final Exam
30%
Class Participation 10%
Note the total of all
category weights must always be 100%.
During the actual course, you might have 12 Homework items, 8 Quizzes,
1 Midterm Exam, and 1 Final Exam and 1 Class Participation item, which
you will create using the tools under the Items tag. Each of
these "Items" can have different maximum point values if you wish.
For example, four of the Homework items might have a maximum
point value of 10, while remaining eight homeworks can be based on 100
points. Using this example, the final grade is calculated as:
(Total Points actually earned on Homeworks/
Total possible points that could have been earned on Homeworks) X 20%
Plus
(Total Points actually earned on Quizzes/
Total possible points that could have been earned on Quizzes) X 15%
Plus
(Total Points actually earned on Midterm
Exam/Total possible points that could have been earned on Midterm Exam) X 25%
... and so on for each category.
Here's some additional information on the items you'll find under the
Categories tab:
Category name:
This is the name of the category. You'll find that
certain punctuation
marks are not allowed within a Category name. Examples of
category names are "Quizzes", "Exams", and "Homeworks"
Weight
This is the weight, from 0-100%, used when
a final grade is calculated using the "Category weight system"
(selected under the Final Grades tab). A weight must always
be
entered, and the sum of all
category weights must always equal 100%, even when you are not
using the "Category weight system".
Example. Suppose you intend to give a number of Quizzes that
taken together, will count for 25% of the final grade. Create
a
category named "Quizzes" and set the weight for 25%. Then use
the
tools under the Items tab to create your individual quiz items, placing
them under the
Quizzes category.
Items
in this category
This column shows the number of gradable items that have so far been
associated with this category. If there's one or more items,
you
can click on the link to get a list of those items.
Drop __
lowest scores
The gradebook program can automatically
drop a specified number of lowest scores for items in a category when
calculating a student's final grade. For example, you can use
this setting to specify that the lowest two scores for items in a
Quizzes category be dropped.
If N is the number of lowest scores that will be dropped, this feature
only begins taking effect when N + 1 scores have been assigned to a
student. (E.g. If you choose to drop the lowest two Homework
scores, no action is taken on a student's final grade until that
student has received at least three Homework scores.)
An Item within a category can be marked as "Extra Credit". Extra Credit items are never counted as one of the lowest
scores.
Percentages are used to determine which is the lower of two scores.
Given a quiz where the student scored 8 points out of a
possible
10 points, and a second quiz where the student scored 75 points out of
a possible 100 points, the second quiz has a lower score than the first.
Internally, the program system treats an automatically dropped score as
if that item was never assigned to the student in the first place.
Ungraded?
The gradebook program can be used to track items that are not graded.
Examples include the number of days absent or
whether or not a student has completed a particular task.
This
can be achieved by creating a category (you can call it something like
"Not Graded") with a Weight of 0%. Any item assigned to a
category with a 0% weight is ignored completely when a final grade is
calculated. This is true whether you are using the "Points
based" method or the "Category weights" method for calculating a final
grade.
The checkbox in the Ungraded? column is linked to the Weight value for
that category. If you put a check in the box, the Weight for
that
category is changed to 0. The Ungraded? checkbox is a
convenient way of setting a Weight value to 0%.
Delete
A "Delete" option is available only for categories that have no Item
members. If you want to delete a category that has gradable
Items
associated with it, first use the form under the Items tab to change
those items to another category.
(Jump to top)
Final Grades

The Final Grades controls specify how a student's final letter
grade should be calculated.
General Scoring Method
Do not Calculate a
final Grade
When this option is selected, the program makes no attempt to calculate
a final grade based on the scores entered, and all other settings made
on this page will be ignored.
Point based system
When this option is selected, a final numeric grade is determined by
adding up all of the points scored by a student on each of the gradable
items, and dividing that number by the total number of points the
student could have possibly scored for all of the items.
Categories and their weights are completely ignored with this
grading method.
Example. Suppose a student received the following scores:
| Item Name |
Maximum
Points for Item |
Student
Score |
| Homework 1 |
100 |
88 |
| Homework 2 |
25 |
18 |
| Midterm |
200 |
189 |
| Final |
300 |
233 |
This student's final numeric grade is: (88 + 18 + 189 + 233)
/ (100 + 25 + 200 + 300) = 528 / 625 = 84.48%
Depending on your Rounding Method selection, this will be rounded to
the nearest whole number (84%) , or the nearest tenth (84.4%).
That rounded percentage is used with the Grading Scale you
specified to determine a final letter grade.
Category Weight system
This option makes full use of the Categories and their associated %
weights. Each category is first considered separately. For each category, divide the total number
of points scored by the student by the maximum number of points they
could have scored for that category. Multiply that number by
the % Weight for that category, then add all of these subtotals
together.
Example. Suppose you have set up the following Categories and
Weights, using the tools under the Categories tab:
| Category
Name |
Category
Weight |
| Homeworks |
20% |
| Quizzes |
20% |
| Midterm Exam |
25% |
| Final Exam |
35% |
At the end of the course, a student achieved the following scores:
| Item Name |
Maximum
Points for Item |
Category |
Student
Score |
| Homework 1 |
10 |
Homeworks (20%) |
7.5 |
| Homework 2 |
20 |
Homeworks (20%) |
14 |
| Homework 3 |
10 |
Homeworks (20%) |
7 |
| Quiz 1 |
100 |
Quizzes (20%) |
77 |
| Quiz 2 |
100 |
Quizzes (20%) |
88 |
| Quiz 3 |
100 |
Quizzes (20%) |
92 |
| Quiz 4 |
10 |
Quizzes (20%) |
8 |
| Midterm Exam |
100 |
Midterm Exam (25%) |
91 |
| Final Exam |
100 |
Final Exam (35%) |
83 |
To calculate this student's final numeric grade, we take each category
separately.
Homeworks
(7.5 + 14 + 7) / (10 + 20 + 10) = 28.5 / 40 = 0.7125
Homework contribution = 0.7125 X 20% = 14.25%
Quizzes
(77 + 88 + 92 + 8) / (100 + 100 + 100 + 10) = 265 / 410 = 0.8548
Quizzes contribution = 0.8548 X 20% = 17.096%
Midterm Exam
Midterm Exam contribution = (91 / 100) X 25% = 22.75%
Final Exam
Final Exam contribution = (83 / 100) X 35% = 29.05%
When the contributions from all four categories are added together, we
get:
14.25% + 17.096% + 22.75% + 29.05% = 83.146%
Depending on your Rounding Method selection (described next), this will be rounded to
the nearest whole number (83%) or the nearest tenth (83.1%). That rounded percentage is used with the Grading Scale you
specified to determine a final letter grade for this student.
Select rounding method:
Round final percent to a whole
number
When selected, the final numeric grade will be rounded to a whole
number before the letter grades table is used to look up a final letter
grade.
Examples. 76.804% will be rounded to 77% and 73.262%
will be rounded to 73%
Round final percent to nearest
tenth
When selected, the final numeric grade will be rounded to the nearest
tenth before the letter grades table is used to look up a final letter
grade.
Examples. 76.804% will be rounded to 76.8% and
73.262% will be rounded to 73.3%
Setting
the Grade Scale
This form sets the scale used to determine a student's final letter
grade for the course.
The default grade scale is shown below. Using this scale, a student who scored a 81.1% final grade would receive a 'B-'
as a final letter grade, and any student who scored a 93% or higher
would receive an 'A'.

(Jump to top)
Release

The controls found under the Release tab are used to allow your
students to view their own grades.
Release
Grades Now
You can think of a "Release" as a snapshot of your grade book taken at
a certain moment, This snapshot of your grade book becomes
available for your students to view in such a way that a
student
can see only their own grades.
When grades are released, students will see a
red star on the Grades module the next time they enter the classroom.
When a student enters the Grades module, they see only their
grades. The teacher can choose whether or not to include some
statistical information, and/or final grades information as explained
next.
Like a photo taken with a camera, what the students see does not
automatically change as you enter grades in your grade book.
You
must do a new release (by clicking on the Release Grades Now button)
whenever you want students to see the changes you made.
Include max, min, and average
scores in student view
When selected, students will see the 'max' (i.e. maximum or
highest) and 'min' (i.e. minimim or lowest) scores, along
with
the average of all the scores for each gradable item, along with their
own grade.
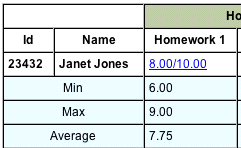
In the above example, student Janet Jones scored 8 out of 10 on
'Homework 1'. Because the teacher elected to 'Include max,
min,
and average scores', she can also see the lowest (6.00), highest
(9.00) and average (7.75) grades for that homework assignment for the entire class.
Include final
grades in student view
When selected, students will see their final grade for the course
expressed as both a numeric grade and a letter grade.

In the above example, this particular student scored a final grade of
87.90, which translates to a B+. The method used to calculate
the
final numeric grade, and the letter grade scale is controlled by the
teacher using options under the Final Grades tab.
It is often best to keep the final grade column hidden from students
until the end of the course. A student may be upset by seeing
an
'F' as a final grade even though she is told the 'F' will improve as
she moves through the course.
Include bar
graphs in student view
When this option is selected, students will have access to the bar
graphs used to depict the scores achieved by the entire class for each
gradable item.
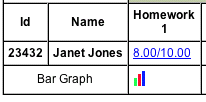
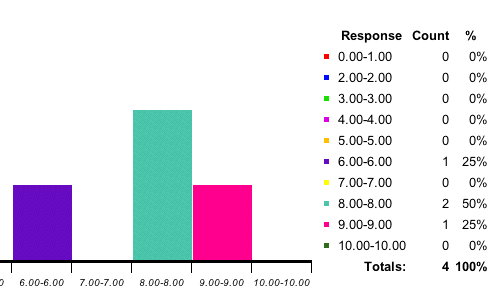
In the above example, the student can click on the  icon
to get a bar graph showing how others in the class scored on the same
assignment:
icon
to get a bar graph showing how others in the class scored on the same
assignment:
Last
release information
This section provides the teacher with access to the grades as they
were the last time they were released to the students. The
information starts with the date and time the last release was
performed, as well as a list of the options that were enabled.
Next are the following commands:
Delete released
grades
Use this command to permanently delete the current release grades.
Note this only deletes the 'Release', which is
the snapshot of the grade book released to your students at a
particular moment in time. This option does not delete any
data
from your grade book.
Info:
Who has opened their grades?
Use this command to see when or if your students have viewed this
release of the grades.
Whenever you perform a new Release of grades, the Grades
button on student screens is marked with a red star and this list of
who read their grades is cleared out.
Note that this shows only the time the student first opened the last
grades you released. When you Release new grades, the old
grades are completely replaced along with any record of the students
access to those grades.
View released grades
Displays the released grades for all students in one table.
This
is similar to the view you see under the Grade Book tab,
however
keep in mind you are not looking at the current state of your grade
book. Instead, you are looking at your grade book as it
appeared
when you performed the last Release of the grades.
View one
student's released grades
After selecting this option, you'll first get a selection list that
allows you to select a student. After selecting a student,
you'll
see exactly what that student sees when he enters the Grades module.
This is useful for office visits, since you can
keep the
grades for other students private.
(Jump to top)
Export

You can download the data from your grade book in two formats: as a
tab-delimited text file, or as a comma separated values (sometimes
called 'CSV') text file. Both formats can be used to import
the data into a spreadsheet program such as Microsoft Excel.
### End of help file ###